After a 4+ year hiatus to raise children I have come back to managing the Traintools E-group. You can find it here...
http://groups.yahoo.com/group/traintools/
I want to especially thank Chris "RADAR" Roeben for his fantastic work in building and moderating the group for these many years. Chris now has a new job starting Monday and we wish him well in his new endeavor.
We've grown! Over 50 new members have joined today alone! Watch for the blog to grow.
Friday, April 16, 2010
Tuesday, March 2, 2010
NMRA Achievement Program Yahoo Group
NMRA Achievement Program Yahoo Group is a new way to find information, guidance and the sometime necessary kick-in-the-pants to help you earn your Achievement Program Certificates and become a MASTER MODEL RAILROADER.
If you are an NMRA member and would like to join, just go here…
I’m Scott Perry, long time Yahoo Group host and found of several groups such as…
Traintools
Trainbooks
HOGRR
And others!
So come join the fun, make new friends and make a plan to Achieve!
Scott Perry
http://modelrailroadersnotebook.blogspot.com/
Wednesday, February 24, 2010
Tools: Midwest Products Scale Lumber Gauge - I4A$$

I'm working on three projects now in the shop, all scratchbuilt. Going between HO and O scales is tough when you have scale lumber laying all over the shop. So I decided to order this scale lumber gauge from Midwest. It cost me $6.

This "ruler" is heavy plastic and marked on two sides. On one edge are cut outs for measuring scale lumber in different sizes. Here you can see 1" and O-scale 1/4" notches. A "10" under O-scale means this is a 10" wide board.

On the other end of the red side you can find HO and N scale. ALMOST? What the !#@$! is almost? The scale says ALMOST HO and ALMOST N. Now, pardon me, but I thought a measuring device was about precision! I guess not.

Let's check it out. I took a hardwood dowel and checked for an area that was 12" in HO scale. I put the dowel in at the point I measured and it was 12". Looks good. There doesn't appear to be any difference in the blue and red side, other than the color.

The same dowel should be a 6" width in O-scale, and it does measure correctly. The gauge is fairly thick an the wood hangs in the cut out well without sliding left and right. This should provide a good measurement.

I checked the 12" ruler with my steel rule and the marking were accurate, crisp and easy to ready. There are holes on either end of the Scale Lumber Gauge for easy mounting.
As a review, the jury is out. I don't like ALMOST on a measuring tool and I ALMOST didn't buy it. However, it appears to be more accurate than it gives itself credit for. I'll keep using it on my workbench for a while and let you know. Guess you can't go wrong with $6 so if you do scratchbuild, you may want one.
Tools: NWSL Chopper II - B1D$$$

But hey, just like women, we can replace him with just a quick trip to town!
So I stopped by my local hobby shop (a convenient 4.1 miles from home) and bought a Chopper II. Really I wanted the same old Chopper I that I've used for over 20 years, but they didn't have one. Thus, I coughed up $40 and bought this new and modified version. Actually its been around for years.

I don't normally get all emotional over things like tools but this is a beautiful piece of equipment! Cast in aluminum with a strong handle it appears to be super sturdy. The lines and wording are cast into the metal and painted bright yellow. The cutting surface is replaceable and can be turned a quarter at a time as the surface wears out from razor cutting. Unlike my old unit the angles for miter cuts are made of steel and are heave. The holding clamps are spring loaded metal as well. She'll be around for a long time!

When you open the box, look for the screws taped to the lid!!! I almost threw them out as they are hard to see. These are replacement screws for the blade holder. I'll tape these to the bottom of the cutter and will mount two magnets for securing the angles. Nice to have them in steel!

The instructions were a bit lacking. Really they should start of in big red letters THIS GADGET WILL TAKE YOUR FINGER OFF IN A SPLIT SECOND! JUST ASK LEFTY! I read through them and didn't see any particular point of interest. There are no diagrams or pictures, so I tossed it in File 13.

I took a small magnet and tested the angle to make sure it was steel. Yup, we have attraction!

Then I pre-heated my hot glue gun and put a large spot of hot glue on the bottom of the chopper.

I pushed the magnet into the hot glue and there! You have a keeper for your angles!

I'm working on a model for my Okefenokee Railroad called Dr. Bank's Office, so I thought I'd give her a workout tonight. I like the feel of the cutter with its strong arm and secure blade. The cut is smooth and the cutting pad receives the blade nicely. Cuts are relatively smooth...more cutting than breaking, but it still doesn't cut a whole lot better than the old style. The clamps hold the angles tightly and repeated cuts are spot-on accurate. The heavy base keeps it from moving while I work, and I really like that.
Some drawbacks are the black paint. While it is nice to look at, the black paint absorbs all the light making it hard to see where you are cutting. The larger handle and very large blade holder block out even more of your line of sight. It is much harder to use. As you can see from the picture above I removed one of the clamps because it was in the way when I was trying to cut O-scale 2x4 lumber.
My overall review is that it is all show and no go. At the next train show I'll find one of the older $25 models and buy it, then sell this one on Ebay. Or maybe just leave it in my shop for people to say "wow, that is a pretty cutter!"
Some advice from Reg Barron...
- I would not use a chopper for anything thicker than 1/8" (and that for rough cut stuff like NG ties). You can flip the wood over if it does not cut cleanly on first chop.
- works best on thin wood (1/16" and thinner).
- make sure blade is new and sharp
- be sure the wood is well supported and you are not cutting over old grooves from previous cuts. Rotate or replace the cutting mat. The combination of a groove and a dull blade, might cause the wood to break??
- use a stop for repetitive cuts
- I have also angled the blade up with a spacer to get clean edge cuts.
- an easier way is to touch up edge with the sander. This also helps with getting a slightly longer piece to exact length.
- for thicker wood, consider the Mitre Rite with its fine tooth back saw. When using the saw, ease up at the end of the cut, to avoid a break when the cut is almost finished. Or use a a sacrificial piece under the good piece of wood. This provides support as the blade breaks thru.
First I am only familiar with the Chopper 1 and 3 but much of this might apply to the 2. On my machine, there is a small piece of aluminum angle screwed to the masonite base. The angle piece also is connected to the chopper arm. If this is tilted up on one side about 1/16" with a small spacer, the resulting cut will be closer to square rather than the wedge cut that usually occurs, especially with thicker stock. To do this I remove the two mounting screws (that come up from the bottom and are threaded into the angle piece. These screws are replaced with ones slightly smaller that pass thru the holes in the base and the angle piece. They are secured at the top with nuts, after a small bit of 1/16" plastic strip is inserted to one side on the angle piece (and under it). This tilts the whole cutting assembly.
Another trick I use is to widen the fence. This is easy to do with a strip of plastic or wood (1/16" thick and about 1/4" wide - width is not critical). I simply tape this in front of the original fence, on the side of the machine where I hold the stock to be cut (does not need to go the whole length of the fence on both sides of the blade). This presents a new section of the blade to the stock. I find the part of the blade nearest to the fence tends to dull fastest. The result is less of a chance of crushing the stock being cut.
For those of you who are really "gung ho", it is possible to resharpen both single edge razor blades and the blades used in modeling knives (such as #11). Google "scary sharp" for more info.
regards,
Reg Barron
Reg Barron
Wednesday, February 3, 2010
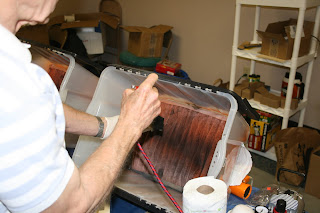
Cheap and Portable Airbrush Cabinet
WARNING: READ THE INSTRUCTIONS THOROUGHLY BEFORE STARTING CONSTRUCTION. PURCHASING THE WRONG TYPE OF FAN AND USING SOLVENT BASED PAINTS CAN CAUSE AN EXPLOSION AND/OR FIRE. BE SAFE! THE BLOG AUTHOR WILL ACCEPT NO RESPONSIBILITY FOR YOUR IGNORANCE OR CARELESSNESS!
For some reason I can't find my drawings of this handy and inexpensive airbrush cabinet. I found the plans on the internet as posted by a model car buff. A few years ago I taught a class on airbrushing and needed four inexpensive and portable cabinets.

The cabinet is made from a plastic tote bin with fold down flaps for the lid. I bought them at Walmart for $19 each. I bought transparent ones, not solid colors, so the light would come through. The photos are from the class.

I cut a roughly 1 foot x 1 foot square hole in the bottom of the of the tote bin to use as a port. Inside I put a small furnace filter that I bought at Home Depot.

Not shown, on the back, I mounted an inexpensive AC bathroom fan for ventilation. AC means ALTERNATING CURRENT. This is not a DC fan. YOU MUST BE SURE TO BUY THE RIGHT ONE OR IT COULD RESULT IN AN EXPLOSION WHEN USING SOLVENT BASED PAINTS. AC FANS DO NOT USE MOTOR BRUSHES THAT CREATE SPARKS. It was $14 at Home Depot. It is bolted to the back of the tote for easy removal.

The vent fan causes the airbrush booth to sit at a very convenient angle for standing up to spray, or you can sit the tote bin down for sitting and painting. We painted a ton of rolling stock that day and never had the first problem with any of them. We used acrylic (water based) paints that day due to the tight quarters in the room. The fan had just the right pull to catch the particles, but not to disturb the spray pattern.

The box gives you plenty of room to work.

The REALLY neat thing about the box is....once you are done, you remove the fan and put all your stuff back in the box. We were using the small compressors and put them back in the box along with the brushes. Very handy for teaching a clinic that is mobile!
If you coat the insides of the tote bin with furniture polish before you paint, you can wipe the paint out of the booth before you put your supplies inside.

Here is one of the airbrush booths being used at a clinic the other day. They are perfect for moving, and the cabinet becomes the storage unit for the compressor, airbrushes, and bottles.
 Here is the A/C fan attached to the back. A few nut/bold fasten it to the bottom and a liberal amount of duct tape seals the device. We mounted a 120 volt plug to the power cord and plug it into a terminal strip with a switch for easy power on/off.

The flexible dryer vent hose is attached to the blower and runs through another furnace filter (for acrylics only!)

Then the unit is place on top of a vented box to catch the particulates. Crude, but it works VERY well!

Here you can see the well worn interior furnace filter that is now 2 years old. Guess we should replace it!

Iron Mike Devaney teaches a three hour weathering clinic using the portable air brush booth.

We had about 20 students for the class and all painted, weathered and decaled rolling stock. Most were able to use different types of brushes furnish by BADGER. Thanks, Badger! I wouldn't use anything else.
Total cost of the airbrush cabinet was less than $40 and all are still going strong.
For some reason I can't find my drawings of this handy and inexpensive airbrush cabinet. I found the plans on the internet as posted by a model car buff. A few years ago I taught a class on airbrushing and needed four inexpensive and portable cabinets.

The cabinet is made from a plastic tote bin with fold down flaps for the lid. I bought them at Walmart for $19 each. I bought transparent ones, not solid colors, so the light would come through. The photos are from the class.

I cut a roughly 1 foot x 1 foot square hole in the bottom of the of the tote bin to use as a port. Inside I put a small furnace filter that I bought at Home Depot.

Not shown, on the back, I mounted an inexpensive AC bathroom fan for ventilation. AC means ALTERNATING CURRENT. This is not a DC fan. YOU MUST BE SURE TO BUY THE RIGHT ONE OR IT COULD RESULT IN AN EXPLOSION WHEN USING SOLVENT BASED PAINTS. AC FANS DO NOT USE MOTOR BRUSHES THAT CREATE SPARKS. It was $14 at Home Depot. It is bolted to the back of the tote for easy removal.

The vent fan causes the airbrush booth to sit at a very convenient angle for standing up to spray, or you can sit the tote bin down for sitting and painting. We painted a ton of rolling stock that day and never had the first problem with any of them. We used acrylic (water based) paints that day due to the tight quarters in the room. The fan had just the right pull to catch the particles, but not to disturb the spray pattern.

The box gives you plenty of room to work.

The REALLY neat thing about the box is....once you are done, you remove the fan and put all your stuff back in the box. We were using the small compressors and put them back in the box along with the brushes. Very handy for teaching a clinic that is mobile!

If you coat the insides of the tote bin with furniture polish before you paint, you can wipe the paint out of the booth before you put your supplies inside.

Here is one of the airbrush booths being used at a clinic the other day. They are perfect for moving, and the cabinet becomes the storage unit for the compressor, airbrushes, and bottles.


The flexible dryer vent hose is attached to the blower and runs through another furnace filter (for acrylics only!)

Then the unit is place on top of a vented box to catch the particulates. Crude, but it works VERY well!

Here you can see the well worn interior furnace filter that is now 2 years old. Guess we should replace it!

Iron Mike Devaney teaches a three hour weathering clinic using the portable air brush booth.

We had about 20 students for the class and all painted, weathered and decaled rolling stock. Most were able to use different types of brushes furnish by BADGER. Thanks, Badger! I wouldn't use anything else.
Total cost of the airbrush cabinet was less than $40 and all are still going strong.
Wednesday, January 27, 2010
Tools: Clamps B1A$$

You cannot have enough clamps. If you didn't hear that, I'll say YOU CAN NEVER HAVE ENOUGH CLAMPS! Just when you think you have enough, buy some more and then ask for some for Christmas. Then you will have 25% of the clamps you need. Repeat the process.

Clamps don't have to be expensive. These medium size spring clamps come in boxes of 12 and can be had for less that $20. They are perfect for holding boards in place and for building spline roadbed.

This QuikKlamp bar clamp is much more expensive and comes in a wide variety of sizes. I have some smaller than an HO locomotive. They are easy to use and fasten quickly, which comes in handy. Put this one on your Christmas list.

At the hobby bench I use much smaller varieites of the same thing. These are vice-grips which make for strong and very adjustable gripping. The are about 5 inches long.

Vice grips come in all kinds of shapes and sizes. I use these for metalwork.

Hemostats are the smallest of the clamps. These also come in many different sizes and clamping strengths, so I have quite a few varieties.
My big shop clamps are kept in a large plastic tote bin with a cover. They include bar clamps, pipe clamps, spring clamps (metal and plastic), C-clamps, angle clamps and more. Make it a practice to pick up a clamp everytime you go to the hardware store and you'll have a good collection in no time.
Monday, January 25, 2010
Thursday, January 14, 2010
Quick! Grab the Bastard! - Common Types of Files for Modelers Part 1
From my articles in Sn3 Modeling Guide...
Welcome to the first installment of Tools of the Trade! My goal is to further our knowledge of model building tools and techniques while helping the model railroader develop his skills. It also gives me a very good reason for continuing to buy the latest tools at the local hobby shop. A tool is any device that enables the accomplishment of a job or task. This can be a hammer, screwdriver, jig (now called a positioning device by the politically correct), camera or even a pen used for taking notes. With that said, let’s jump right in and get our hands dirty.
The file is one of those items that I consider a mandatory modeling tool. For the beginner it is one of the first tools that really requires the mastering of proper techniques. For the seasoned model builder it is one of a wide variety of types and styles of metal (and plastic) shaping tools used for construction and finishing purposes. There are many types of files in the world and my tool box has quite a collection.
The basic parts of a file are as follows:

The file has an arrangement of cutting teeth or grooves along the face. There are three basic groove patterns; single cut, double cut, curved cut and rasp cut. Single cut files have one row of parallel grooves and are used for finishing work under light pressure during the stroke. Double cut files have two rows of grooves, one at about 45 degrees and another groove at about 75 degrees. This type of file is used for rapid removal of metal and for rough finishing, usually under heavy pressure. The curved cut file is a dual-purpose tool allowing for coarse shaping using the middle of the face, or for smooth finishing by using the sides of the face. The rasp cut has raised burrs and is usually used on softer materials such as wood or plastic to remove large quantities of the surface rapidly.
Files are rated by the number of teeth per inch on the face, which we call the “coarseness.” There are two types of coarseness ratings; American and Swiss Pattern. In the American rating system you have four types; coarse (the fewest teeth per inch with the most bite), bastard, second and smooth (which has the most teeth per inch and gives a finer finish). In the Swiss Pattern system you have 00 (the most coarse), 0, 1, 2, 3, 4 and 6 (the finest).
In model railroading we generally use six different classes of files. Mill files are used for sharpening tools and for general filing. They are usually single cut and slightly tapered in width, possibly being the most common of the files. Machinist’s files are designed for metal cutting and are almost always double-cut. They can be any shape over the length and are used for brass and other hobby metals. Curved tooth files can be firm or flexible and can be mounted like a hacksaw for filing corners and unusual shapes. Rasp files are used on wood and foam, such as a Surfoam tool. These hungry files take large bites and remove material very quickly, especially on foam scenery. Riffler files are smaller, specialty files that have a smooth handle and a curved filing tip. They are designed for die work and are a handy for filing in tight places. The most common file class for model railroaders is the needle file or jeweler’s file. These are simply smaller renditions of the previous classes of files. While diamond “files” are also a common item in most toolboxes, I don’t consider them a file so much as I consider them a sanding tool.

There are many different file shapes and sizes. The picture shows many of the different file profiles that are common for modelers. Round or “rat tail” files are handy for getting in small spaces. I often use the tapered square files for track laying since they easily can remove burrs on the web of the rail. Most hobby shops offer a variety pack of different shapes and sizes.
In our next column we’ll discuss the proper techniques of filing and how to choose the right file for the job. For now, grab the bastard (usually a flat mill file that is single-cut and reasonably coarse) and go to work!
Monday, January 11, 2010
Coolie Tools! Basic Track Layer's Toolbox
Every good model railroader will tell you that there is one piece of advice that is mandatory for the enjoyment of your layout, and that is to do the best job you can when laying track. Laying flex track is not difficult and neither is hand-laying, but it does require some specialized tools. Let’s take a quick review of what’s in the Track Work tool box.
My tools for track laying are kept in a separate Track Work tool box. This is one set of tools that doesn’t stay at the workbench, so the more mobile they are, the better. I prefer clear, plastic shoe boxes so that I can quickly see what is contained inside. The lid removes completely so that you have easy access to the contents. Along with the tool box is a plastic tray for displaying the tools, much like a Dentist does before he charges you $1,000. The tools are all unique to this box and not shared with the other workbench tools. The only things that I use for track that are not included in the box are gauges, which I keep in a separate Gauges & Measuring Devices tool box.

I know you get tired of hearing it, but safety first! The most important tool in your Track Work box is a pair of safety glasses. Several years ago I was hand-spiking a section of track when the grip that I had on a spike gave way. At approximately eight hundred miles per hour the spike ricocheted off the rail and proceeded to lodge itself in my eye ball. The doctor, who was a model railroader, was pleased to remove it and treat my infection. As always, safety first.
Along with the soldering iron go soldering flux, a small paint brush, heat sinks, solder and sandpaper. I prefer paste flux because it will stick to vertical surfaces. Using a small brush, I just rub some on the area to be soldered. Metal heat sinks help to protect expensive plastic-tied turnouts from melting. You can also use wet tissue paper. There are two kinds of solder in the box; standard non-core, and silver. I only use the silver solder for joints that need to be extremely strong, such as holding switch points to a throw bar. The sandpaper is used to clean the tip of the soldering iron from time to time.

Normally I don’t promote name branded tools, but the Xuron track laying tools are excellent and I don’t use anything else. In the box I have a track cutter, needle nose pliers and a spiker. The cutter is perfect for making a nice, smooth, flat-edge cut in the rail and it only leaves a small spur to file off. Only use the cutter for track until it gets dull. I write in ink on the handles “track only” and when the writing wears off, I buy a new cutter and retire the old one to the workbench for cutting wire. You can break the jaws, so be careful what you cut! The rail piece that you trimmed off can also fly several feet, so be extra careful. The needle nose pliers are strong and perfectly shaped for grabbing and bending. The spiking pliers have a notch cut into the nose that is designed to hold spikes. I thought this was a time-consuming feature until I realized how many spikes I was dropping on the floor. You can get these tools from most hobby stores.

Xuron Cutter Jaws
A wire stripper is a handy item to have as you will be trimming quite a bit of wire as you install turnouts and route power to the track. I prefer the steel type with the gauge of the wire written next to the cutter. You can also use a hobby knife for that job. The knife also comes in handy for trimming plastic ties, cutting plastic spike head on flex track, and for other track laying chores.

You will need a good set of metal files in your box. A variety pack of shapes and sizes will be the best. Filing track is tough on files, and they will need to be cleaned with a file brush or replaced fairly often. A little touch of household lubricant will help the file cut smoother and will help keep it from clogging.

Pin Vise Drill
Other tools that you will need will be screwdrivers, a pin vise and a track cleaning block. I keep both a small Phillips and Flat Head screwdriver in the box, mainly for mounting switch machines. Occasionally I use the Flat Head screwdriver for prying up rail or spikes, so that tool needs to be of good quality. The pin vice is used to pre-drill spike holes or to drill linkage holes for turnout switch machines. I also use it for making centerline holes for mounting flex track.
Some optional tools that you may choose to keep are a rag for cleaning track, a small bottle of Alcohol for removing flux and cleaning rail heads, a spike-holder which is a magnet glued to the inside top of a bottle, a small tin for rail joiners, and an abrasive track cleaning block. All of these will come in handy if you lay a large amount of track and are very inexpensive.

NMRA Gauge for HO
Track and radii gauges should never be kept in the Track Work tool box. They are delicate and you don’t want them damaged or rusty. Keep these in their own tool box and just bring them out when you need them. Always check them for damage or rust, as that can throw off your track. Refrain from using plastic gauges and measuring tools if you can as they have a tendency to be inaccurate. They will melt if they get near hot rails.
Good track means good running trains. Put together your Track Work tool box today and head for the basement. You know that turnout that you’ve been meaning to repair for ten years that always derails the Mallet? Well, safety first!

Items in the Track Work Tool Box
- Safety Glasses
- Soldering iron
- Flux
- Small Paint Brush
- Heat Sinks
- Solder – Standard
- Solder – Silver
- Sand Paper
- Xuron Track Cutter – for track only
- Xuron Spiking Pliers
- Xuron Needle Nose Pliers
- Wire Strippers
- Hobby Knife
- Metal Files
- Phillips Screwdriver - Small
- Flat Head Screwdriver – Small
- Pin Vise and Drill Bit
- Spike Holder
- Rail Joiner Holder
- Bottle of Alcohol
- Abrasive Track Cleaner Block
- Shop Rag
Gauges Used
- NMRA Standards Gauge
- Track Gauge
- Curve Radii Gauge
- Parallel Gauge
What else do you have in your tool box? Post a comment or write me at scottgperry@comcast.net
Tools: Mini Chop Saw A3C$$$

It came from Harbor Freight. Not the most robust thing in the world, but it will do until I find something better. Several of us in the NCI group have them.
http://www.harborfreight.com/cpi/ctaf/displayitem.taf?Itemnumber=42307
They are $28 and I've cut over 1,000 pieces of wood with mine. Kind of hard to see underneath the saw. I reviewed in in the TRAINTOOLS egroup on Yahoo.
Had to fix Bob's as his switch wore out. He's cut over 10,000 ties with his (HO scale)
I'd buy another one!
Scott G. Perry, CPM
Saturday, January 9, 2010
Tool: File Sets - B1B$$

Metal files are a key item in the model railroad arsenal, especially for kit builders and track layers. The are mandatory for the model railroader's toolbox and you should buy the best quality you can afford. The set above is not high quality, but they are diamond files and have very good cutting ability. You'll want a set with a variety of blade shapes and tapers.

Most model files don't have handles so you want to invest in a good one that is comfortable for your hand. Just insert the file and screw down the clamp.
Tool: Screwdrivers Set - B1C$

The screwdriver is the most basic of tools and mandatory for beginners. You can't assemble a freight car kit or take apart a locomotive without them. There are a million varieties and sizes of screwdrivers. I highly recommend that you buy a miniature screwdriver set that includes both flat head and Phillips head drivers. All of them should have pivoting heads. Ask your hobby dealer which brand he recommends.
While I have hex key drivers and other unusual screwdrivers I very seldom use them. Most have never been used. In my box I keep two sets, one magnetized and one not. My Wiha set has longer blades for reaching deep inside a locomotive.
Screwdrivers are not pry bars, chisels, wedges, levers or any other of a host of creative ways to use them. Keep these drivers in EXCELLENT condition. If you need a set to bang on, buy a cheap set at the next train show.
Comments? Brand recommendations? We'd love to hear from you!

01 The Beginner’s Toolbox
The Beginner’s Toolbox
If you are new to the hobby, welcome! I've gotten over 35 years of enjoyment from model trains and I hope you do, to! When you are just getting started you are going to need some basic tools to perform general maintenance and to build simple kits. The above list will take care of most of your immediate needs.
There is some push back on this, but I think you should invest in the best tools you can buy for this list as it will be your mainstay in the toolbox. I've worn out tons of these items so you want to buy durable items.
Print this list and take it to your local hobby shop. Yeah, you might pay a little more, but at this stage in the game a little advice goes a long way. Give the owner your list and ask him to help you get what you need.
- Hobby Knife & Blades
- Set of Miniature Screwdrivers
- Files & File Holder
- Small Nosed Pliers
- Tweezers
- Sprue Cutter
- Paint Brushes
- Xuron Tool
- NMRA Track Gauge
If you are new to the hobby, welcome! I've gotten over 35 years of enjoyment from model trains and I hope you do, to! When you are just getting started you are going to need some basic tools to perform general maintenance and to build simple kits. The above list will take care of most of your immediate needs.
There is some push back on this, but I think you should invest in the best tools you can buy for this list as it will be your mainstay in the toolbox. I've worn out tons of these items so you want to buy durable items.
Print this list and take it to your local hobby shop. Yeah, you might pay a little more, but at this stage in the game a little advice goes a long way. Give the owner your list and ask him to help you get what you need.
Safety
A Note On SAFETY!
WARNING: Always practice good safety habits when using any tool. Always read the instructions on how to properly use your new tools and what protective equipment you should wear.
Some important safety equipment you should own/use:
- Safety Glasses with side shields (rated polycarbonates, not regular glasses)
- Fire extinguisher
- Gloves (when applicable)
- Apron
- First Aid Kit
Hand tools:
- Use sharp blades, they cut easier than dull blades.
- Always cut away from you and anyone else.
- Always think, "Where will the blade go if it slips?"
- Use a meat cutter's glove or fish filleting glove if you do a lot of work with sharp knives, as they will deflect slashing cuts (but not piercing cuts).
- Be careful with tools designed to puncture or gouge.
Power Tools:
- Read the directions for the tool and follow all safety advice
Tool: Hobby Knife - B1D$
HAZARD WARING! HOBBY KNIVES ARE VERY DANGEROUS IN THAT THEY ARE A SHARP CUTTING INSTRUMENT THAT CAN ACCIDENTALLY CAUSE LACERATIONS AND CUTS TO YOUR HAND AND OTHER BODY PARTS. EXTREME CAUTION SHOULD BE USED WHEN CUTTING AND SAFETY GLASSES SHOULD BE WORN. KEEP FINGERS AWAY FROM CUTTING AREA AND ALWAYS CUT AWAY FROM YOUR SKIN. ALWAYS USE A SHARP BLADE.

Knife Kit Assortment
All hobby stores and most general merchandise stores such as Walmart and Target carry these knives. There are many varieties and since you will be using this tool a lot, go ahead and invest in the best quality you can and get a number of them.

From left to right: standard knife, larger knife, fine blade, rotating blade, padded - non-rolling knife.
I personally like the padded knives as they are more comfortable when you are making repeated cuts. The hex nut top on the Excel brand knife keeps it from rolling of the table. I've had a knife roll off the table and stab me through my shoe.
Safety is a major concern with this popular tool. Few experienced modelers don't have a hobby knife scar. Mine is on my left hand and require three stitches as the blade slipped and cut me to the bone. Keep your blade sharp! Change them often. This will help prevent knife slips.
There is much debate on sharpening a new blade. You can use a whet stone, leather strop or diamond sharpener to get an even more sharp blade but I very seldom do this. More often than not I'll switch to a single edged razor blade for cutting that needs that level of sharpness.
We'd like to hear your thoughts on hobby knives! Post your comments below.
Subscribe to:
Comments (Atom)

