WARNING: READ THE INSTRUCTIONS THOROUGHLY BEFORE STARTING CONSTRUCTION. PURCHASING THE WRONG TYPE OF FAN AND USING SOLVENT BASED PAINTS CAN CAUSE AN EXPLOSION AND/OR FIRE. BE SAFE! THE BLOG AUTHOR WILL ACCEPT NO RESPONSIBILITY FOR YOUR IGNORANCE OR CARELESSNESS!
For some reason I can't find my drawings of this handy and inexpensive airbrush cabinet. I found the plans on the internet as posted by a model car buff. A few years ago I taught a class on airbrushing and needed four inexpensive and portable cabinets.
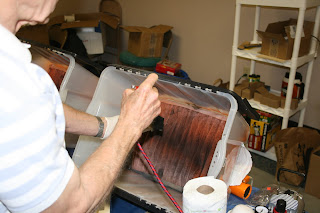
The cabinet is made from a plastic tote bin with fold down flaps for the lid. I bought them at Walmart for $19 each. I bought transparent ones, not solid colors, so the light would come through. The photos are from the class.
I cut a roughly 1 foot x 1 foot square hole in the bottom of the of the tote bin to use as a port. Inside I put a small furnace filter that I bought at Home Depot.
Not shown, on the back, I mounted an inexpensive AC bathroom fan for ventilation. AC means ALTERNATING CURRENT. This is not a DC fan. YOU MUST BE SURE TO BUY THE RIGHT ONE OR IT COULD RESULT IN AN EXPLOSION WHEN USING SOLVENT BASED PAINTS. AC FANS DO NOT USE MOTOR BRUSHES THAT CREATE SPARKS. It was $14 at Home Depot. It is bolted to the back of the tote for easy removal.
The vent fan causes the airbrush booth to sit at a very convenient angle for standing up to spray, or you can sit the tote bin down for sitting and painting. We painted a ton of rolling stock that day and never had the first problem with any of them. We used acrylic (water based) paints that day due to the tight quarters in the room. The fan had just the right pull to catch the particles, but not to disturb the spray pattern.
The box gives you plenty of room to work.
The REALLY neat thing about the box is....once you are done, you remove the fan and put all your stuff back in the box. We were using the small compressors and put them back in the box along with the brushes. Very handy for teaching a clinic that is mobile!
If you coat the insides of the tote bin with furniture polish before you paint, you can wipe the paint out of the booth before you put your supplies inside.
Here is one of the airbrush booths being used at a clinic the other day. They are perfect for moving, and the cabinet becomes the storage unit for the compressor, airbrushes, and bottles.
Here is the A/C fan attached to the back. A few nut/bold fasten it to the bottom and a liberal amount of duct tape seals the device. We mounted a 120 volt plug to the power cord and plug it into a terminal strip with a switch for easy power on/off.
The flexible dryer vent hose is attached to the blower and runs through another furnace filter (for acrylics only!)
Then the unit is place on top of a vented box to catch the particulates. Crude, but it works VERY well!
Here you can see the well worn interior furnace filter that is now 2 years old. Guess we should replace it!
Iron Mike Devaney teaches a three hour weathering clinic using the portable air brush booth.
We had about 20 students for the class and all painted, weathered and decaled rolling stock. Most were able to use different types of brushes furnish by BADGER. Thanks, Badger! I wouldn't use anything else.
Total cost of the airbrush cabinet was less than $40 and all are still going strong.
Subscribe to:
Post Comments (Atom)


What did the exhaust fan vent to? Shouldn't it be connected to tubing of some kind to outside air? Please reply.
ReplyDeleteSteve Moore
kiss@kissmethodinc.com
Yes, there is a "dryer vent" hose connected to the back of the fan that allows for evacuation of the paint particles. NOTE: THIS SYSTEM IS NOT FOR SOLVENT BASED PAINTS. :)
ReplyDelete