Well, my old trusty Northwest Short Line Chopper finally died. We buried him with honors. He'd been a good friend and long time companion of many hours of modeling fun. I hated to see him go.
But hey, just like women, we can replace him with just a quick trip to town!
So I stopped by my local hobby shop (a convenient 4.1 miles from home) and bought a Chopper II. Really I wanted the same old Chopper I that I've used for over 20 years, but they didn't have one. Thus, I coughed up $40 and bought this new and modified version. Actually its been around for years.
I don't normally get all emotional over things like tools but this is a beautiful piece of equipment! Cast in aluminum with a strong handle it appears to be super sturdy. The lines and wording are cast into the metal and painted bright yellow. The cutting surface is replaceable and can be turned a quarter at a time as the surface wears out from razor cutting. Unlike my old unit the angles for miter cuts are made of steel and are heave. The holding clamps are spring loaded metal as well. She'll be around for a long time!
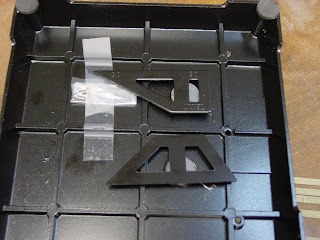
When you open the box, look for the screws taped to the lid!!! I almost threw them out as they are hard to see. These are replacement screws for the blade holder. I'll tape these to the bottom of the cutter and will mount two magnets for securing the angles. Nice to have them in steel!
The instructions were a bit lacking. Really they should start of in big red letters THIS GADGET WILL TAKE YOUR FINGER OFF IN A SPLIT SECOND! JUST ASK LEFTY! I read through them and didn't see any particular point of interest. There are no diagrams or pictures, so I tossed it in File 13.
I took a small magnet and tested the angle to make sure it was steel. Yup, we have attraction!
Then I pre-heated my hot glue gun and put a large spot of hot glue on the bottom of the chopper.
I pushed the magnet into the hot glue and there! You have a keeper for your angles!
I'm working on a model for my Okefenokee Railroad called Dr. Bank's Office, so I thought I'd give her a workout tonight. I like the feel of the cutter with its strong arm and secure blade. The cut is smooth and the cutting pad receives the blade nicely. Cuts are relatively smooth...more cutting than breaking, but it still doesn't cut a whole lot better than the old style. The clamps hold the angles tightly and repeated cuts are spot-on accurate. The heavy base keeps it from moving while I work, and I really like that.
Some drawbacks are the black paint. While it is nice to look at, the black paint absorbs all the light making it hard to see where you are cutting. The larger handle and very large blade holder block out even more of your line of sight. It is much harder to use. As you can see from the picture above I removed one of the clamps because it was in the way when I was trying to cut O-scale 2x4 lumber.
My overall review is that it is all show and no go. At the next train show I'll find one of the older $25 models and buy it, then sell this one on Ebay. Or maybe just leave it in my shop for people to say "wow, that is a pretty cutter!"
Some advice from Reg Barron...
- I would not use a chopper for anything thicker than 1/8" (and that for rough cut stuff like NG ties). You can flip the wood over if it does not cut cleanly on first chop.
- works best on thin wood (1/16" and thinner).
- make sure blade is new and sharp
- be sure the wood is well supported and you are not cutting over old grooves from previous cuts. Rotate or replace the cutting mat. The combination of a groove and a dull blade, might cause the wood to break??
- use a stop for repetitive cuts
- I have also angled the blade up with a spacer to get clean edge cuts.
- an easier way is to touch up edge with the sander. This also helps with getting a slightly longer piece to exact length.
- for thicker wood, consider the Mitre Rite with its fine tooth back saw. When using the saw, ease up at the end of the cut, to avoid a break when the cut is almost finished. Or use a a sacrificial piece under the good piece of wood. This provides support as the blade breaks thru.
First I am only familiar with the Chopper 1 and 3 but much of this might apply to the 2. On my machine, there is a small piece of aluminum angle screwed to the masonite base. The angle piece also is connected to the chopper arm. If this is tilted up on one side about 1/16" with a small spacer, the resulting cut will be closer to square rather than the wedge cut that usually occurs, especially with thicker stock. To do this I remove the two mounting screws (that come up from the bottom and are threaded into the angle piece. These screws are replaced with ones slightly smaller that pass thru the holes in the base and the angle piece. They are secured at the top with nuts, after a small bit of 1/16" plastic strip is inserted to one side on the angle piece (and under it). This tilts the whole cutting assembly.
Another trick I use is to widen the fence. This is easy to do with a strip of plastic or wood (1/16" thick and about 1/4" wide - width is not critical). I simply tape this in front of the original fence, on the side of the machine where I hold the stock to be cut (does not need to go the whole length of the fence on both sides of the blade). This presents a new section of the blade to the stock. I find the part of the blade nearest to the fence tends to dull fastest. The result is less of a chance of crushing the stock being cut.
For those of you who are really "gung ho", it is possible to resharpen both single edge razor blades and the blades used in modeling knives (such as #11). Google "scary sharp" for more info.
regards,
Reg Barron
Reg Barron
Wednesday, February 24, 2010
Subscribe to:
Post Comments (Atom)


the problem with the choppers is that you cannot cut longer than the cutting surface, rendering it as useless .
ReplyDeleteI made a 36" long plywood surface and dropped the chopper into it from below. I angle cut the wood so that it sits tight against the chopper sides and this keeps it in possition. This allows me to cut up to 24" long on the right side and up to 12" long on the left.
I used a piece of 1/16" thick ANGLE ALUMINUM and screwed it too the wood as a fence. i took a piece of 1/4" thick aluminum and made a slim hacksaw cut in it to work as a sliding stop. I drilled a hole and tapped it for an allen head bold to secure it. And also drilled a hole in the far end of the stop so a drywall screw could be used to hold the stop flat to the surface.
This works great when your doing a lot of repetitious long wood cuts.
mike lynch
madmike3434
I never had the 'old' Chopper, but got the new one for ~$35 several years ago and am very happy with it. However, I do agree that the dark colour drains the light from the area, but it does provide a nice contrast for white Evergreen styrene strips...
ReplyDeleteRod Schaffter